Obtained by damping vibrations generated by plates rotation and heads movements
Unlike modern hard disks with hydrodynamic ball bearings, old hard disks were pretty noisy, especially the firsts 7200 rpm units. My IBM Deskstar 60 GXP 40 GB was one of them. I also had a Maxtor 5400 rpm unit (not yet broken) not very noisy that I decided to silence as well.
Building and assembling
My first idea was to use rubber sticks sold in stores for this specific goal (they should replace the metal screws in order to decouple the hard disk from the chassis), but they had two defects: they cost a lot and they were too big to be put in my metal frame. I decided to use a rubber strip cut from a bycicle inner tube I had unused. I showed to be strong and perfect for this goal.
Every hard disk needs two rubber strips. I cut four of them, all about 3.5 cm large, two of them 10-12 cm long and the other two 20-25 cm long. The height is fixed: their width should be about 1 cm greater than the hard disk height and the length at least about 5 cm greater then the metal case where the hard disk is mounted: the hard disk must not touch the metal at all. Another choice is to have the strips about two times longer than the metal frame, in order to be put all around it (more about this later). The last tip is to cut the strip following the main inner tube equator: it’s the only way to have them perfectly straight, not bended.
It’s already clear that my idea was to put the rubber between the hard disk and the frame, however it showed to be not so easy, especially for the Maxtor hard drive, the upper one in the pictures.
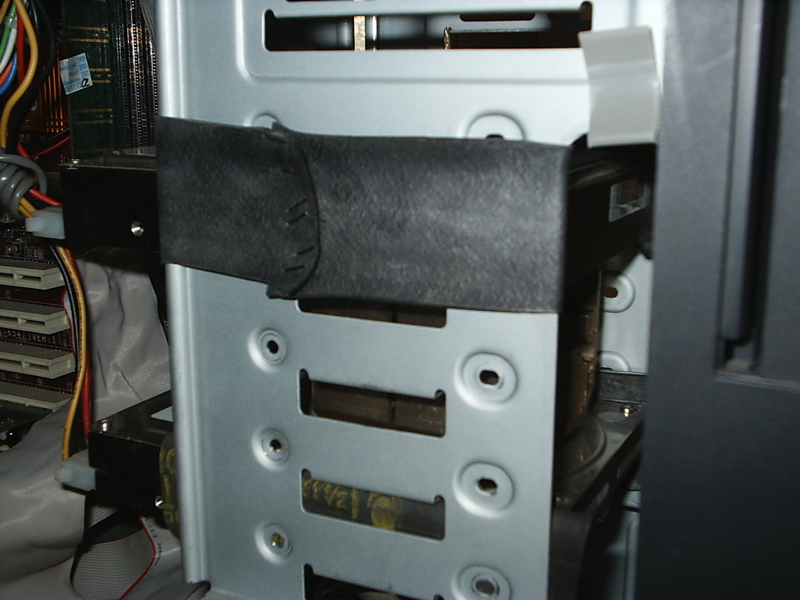
To put the rubber around the IBM hard disk, I followed this sequence (there was not much space to move): I removed the hard disk and completely removed the screws (they would’t have been used anymore). I then put the rubber strips on its sides (I chose the two smallest among the four I mentioned before). These two strips should be longer than the hard disk, so the exceeding rubber was left on the front of the hard disk (where there are no connectors), on the side the hard disk moves towards when you mount it. Now it’s time to put the hard disk back in place, but it won’t be easy: the rubber not only increased the hard disk’s width, but it also increased friction a lot. I solved the problem by having someone widen the metal case of the chassis. Also remember to give a look at the vertical position of the rubber: it must avoid every contact between the hard disk and the metal frame of the chassis.
The final result should be something similar to the following:
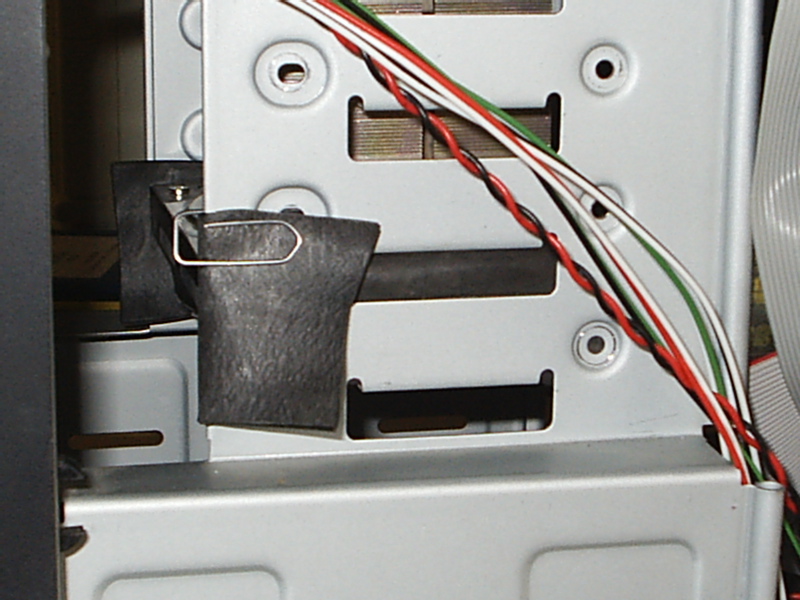
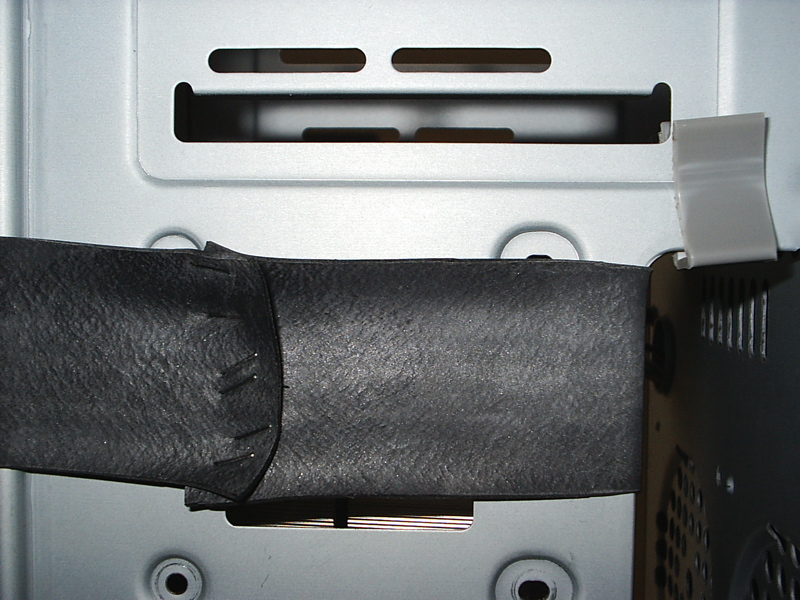
The clip helps to block the rubber and to avoid a change in the air flow inside the chassis (it’s not so good in my computer), while the heatsink visible n the picture is what I described in How to apply a heatsink to an IBM hard disk.
To put the rubber around the Maxtor I followed a different sequence: I chose longer strips, so long I was able to block them outside the chassis with some staples. To do this I also had to strain them, so they were thinner and the hard disk slipped in more easily.
The next picture show the final result and the following one both the hard disks. The latter shows perfectly how the rubber must be positioned vertically: it covers completely the hard disks sides and, partially, top and bottom faces.
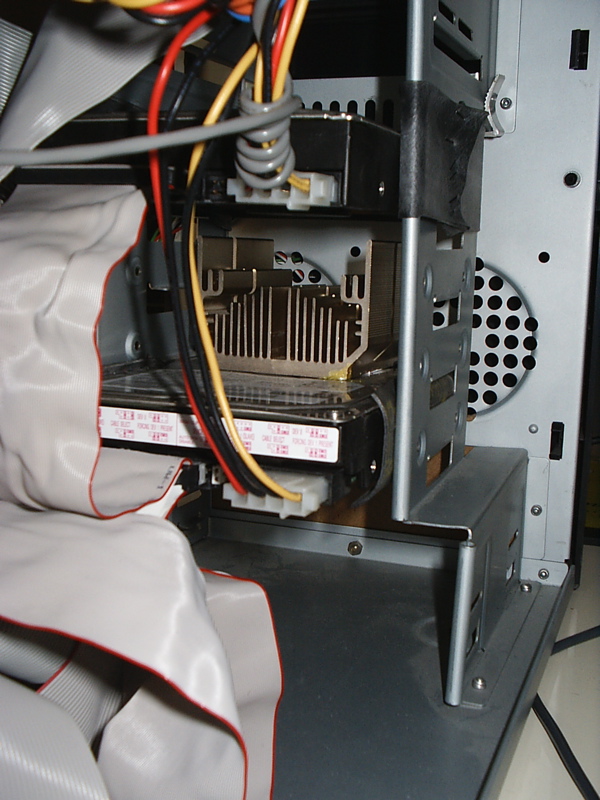
The effect of these modifications really satisfied me: the noise was greatly reduced. Probably the drives will experience an increased working temperature, since the metal frame of the chassis does not dissipate anymore the heat generated by the hard disks, but the are still running cool, so it’s not a problem.
If you need help or more information, feel free to ask me by mail.
First version: 17th April 2006
Riduzione del rumore generato da dischi fissi
Mediante forte assorbimento delle vibrazioni generate dalla rotazione dei piatti
A differenza dei dischi fissi attuali che sfruttano la tecnologia a cuscinetti fluidodinamici, i dischi degli anni passati non erano molto silenziosi, in particolare i primi a 7200 giri/minuto, come il mio IBM Deskstar 60GXP da 40 GB. L’altro disco in mio possesso, un Maxtor D540 a 5400 rpm, (prima della rottura) soffriva meno del problema, ma decisi di silenziare anche quello.
Realizzazione
Inizialmente avevo pensato di utilizzare i gommini appositi per lo scopo, pensati per sostituire le viti normalmente utilizzate per il fissaggio e quindi isolare dal punto di vista vibrazionale il disco dalla carcassa che lo sostiene. Il problema di tali gommini è il costo, elevato, e le dimensioni della carcassa richieste, nel mio caso insufficienti. Ripiegai quindi su della gomma di camera d’aria da bicicletta, poi rivelatasi spessa e resistente e quindi adatta allo scopo.
Servono due strisce di gomma per disco fisso. Nel mio caso, con due dischi, ne ho utilizzate di lunghezze diverse: due di circa 10-12 cm e due di circa 20-25 cm, tutte alte circa 3,5 cm (1 cm più del disco fisso, è importante perché possa in parte avvolgerlo e quindi evitare totalmente il contatto con la carcassa). Questi valori dipendono però dalla carcassa (rack) in uso, in quanto il lato lungo deve o superare di qualche centimetro la lunghezza di questa o avere una lunghezza circa doppia. Ulteriori spiegazioni più avanti. Le strisce sono state tutte ritagliate lungo l’equatore della camera d’aria, così da essere dritte e senza curvature.
L’idea era quella di inserire la gomma fra ogni disco e la carcassa, ma l’impresa non si è rivelata facile, soprattutto per il disco posizionato in alto nelle foto (il Maxtor).
La tecnica di montaggio utilizzata per il disco IBM, che disponeva di un poco di spazio fra lati e carcassa, è stata la seguente: per prima cosa si deve rimuovere il disco, svitando le viti (inutili una volta posizionata la gomma e rimontato il tutto) e sfilandolo. Fatto ciò, gli si posizionano lungo i fianchi le strisce di gomma più corte fra le le quattro sopra elencate, lasciando sporgere la gomma in eccesso dalla parte del disco libera da connettori, cioè dalla parte in direzione della quale si premerà durante il rimontaggio. Si deve ora reinserire il disco, ma non sarà facile: lo spessore della gomma si farà sentire e sarà necessario premere abbastanza, magari facendosi aiutare da qualcuno per allargare leggermente la carcassa. Come se non bastasse, bisogna ricordare di posizionare la gomma a metà altezza rispetto al disco fisso, per avitare un contatto diretto tra questo e il supporto metallico.
Alla fine il risultato, se lo spessore della gomma non era eccessivo, sarà qualcosa simile a questo:
La graffetta serve a bloccare la gomma in eccesso e ad evitare che ostacoli la circolazione dell’aria, già non eccellente nel mio case, mentre il dissipatore che si intravede è quello di cui si tratta nell’articolo Applicazione di un dissipatore ad un disco fisso IBM.
Per il Maxtor ho seguito una procedura differente: per prima cosa ho utilizzato delle strisce di gomma più lunghe, in grado di essere puntate (con una normale puntatrice) sul lato esterno della carcassa: la gomma è risultata in tensione e si è quindi assottigliata. poi ho reinserito il disco fisso, a pressione con lo stesso metodo di prima (facendomi aiutare per allargare la carcassa).
Il risultato è visibile nella seguente foto, seguita da una visione d’insieme in cui si può anche osservare il corretto posizionamento verticale della gomma (nel disco inferiore), tale da evitare il contatto tra carcassa e disco.
Il risultato ottenuto mi ha decisamente soddisfatto, il rumore percepito si è ridotto notevolmente. Da un punto di vista teorico penso non si possa evitare un aumento della temperatura di funzionamento, poiché la carcassa smette di dissipare il calore generato, però i valori di temperatura registrati durante l’uso normale non si sono discostati molto da quelli precedenti all’inserimento delle strisce di gomma, per cui posso ritenermi soddisfatto.
Per ulteriori chiarimenti o commenti, contattatemi per via elettronica.
Prima revisione: 17 Aprile 2006.